We do advance in expansion of functionality and improving developments day by day giving up-to-day possibilities to our users.
Speed up the routine process of uploading hundreds files to your account and make it much easier and handier with our specially developed "4shared Desktop" tool.
Friendly well-known interface and perfect usability of 4shared Desktop will increase productivity of your work and greatly lighten performance of tasks. This easy to use software is designed specifically to help manage multiple file uploads.
System Requirements:
Pentium II 350 MHz class CPU or faster
3 MB of disk space
128 MB of available RAM
Active Internet Connection
Recommended for Windows 2000/NT4/XP
How to install 4shared Desktop:
Click the link to download 4shared Desktop Installer.
Double click on the downloaded file to run the setup program.
Follow the instruction of setup program to install 4shared Desktop.
User instruction about how to use 4shared Desktop:
Login window
On this window you should fill in the login and password of your account that you were using during the registration to 4shared service. If you do not have 4shared account you should click the "Sign up now" link at the bottom of the window to create a new account.
Tick the "Remember me" check box if you want the application to remember the login and password and log in your account automatically when it starts.
Once you felt in the fields click the "Login" button to open your account. If the login or password is incorrect you will stay on this screen. In case you forgot your password you should click the "Forgot your password?" link in the lower right corner of the Login window.
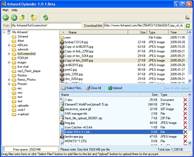
Main window
After the program log in successfully and receive data of your account the main window is shown. There are following main controls:
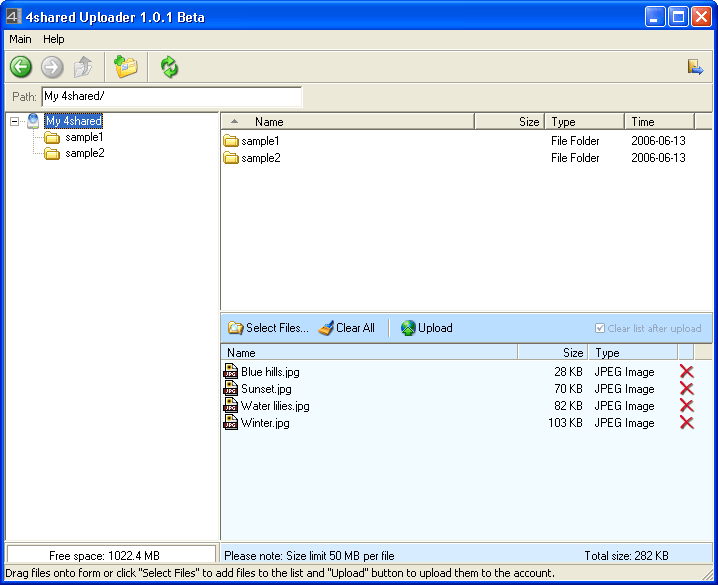
Folder Tree (shows you the folder structure of your account)
List of files and folders (shows you the contents of selected folder)
List of files for uploading (contains the files you wish to upload)
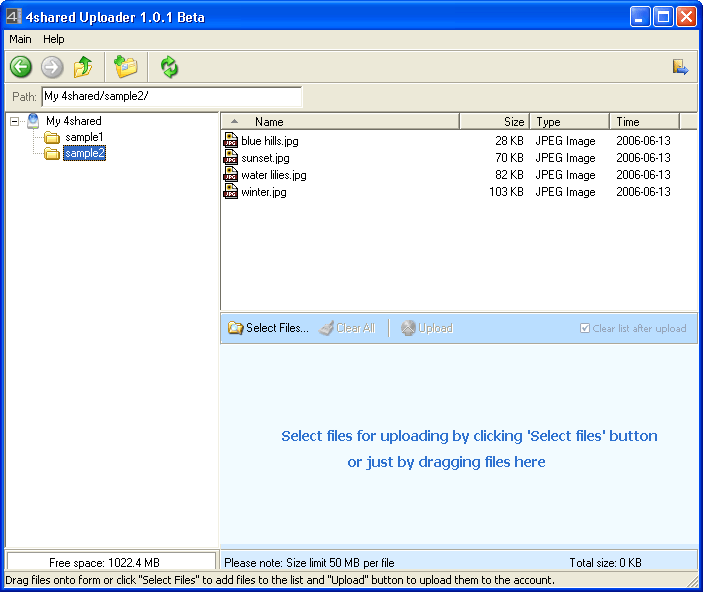
Uploading files
Choose files or folders for uploading simply by dragging them onto this screen or you can use the "Select" button (3) to locate files or folders on your computer that you wish to upload. Please note that when selecting a folder it will be added to the list with all included files and subfolders.
You can delete a file from the list of files for uploading by clicking on the "Delete" icon (7) at the end of the line or by pressing the "Delete" button on the keyboard after the file (or files) is selected. The "Clear All" button (4) is used for deleting all files from the list.
Select the directory where you want to upload files to. To open a folder simply click it in the folder tree (1) or double click it in the list of files and folders (2).
Tick the "Clear list after upload" check box (6) if you wish to delete all files from the lower list after finish of upload process.
Once you chose the files they are ready for uploading. Click the "Upload" button (5) to start the process. You can also stop the upload process by clicking the "Stop" button in the lower right corner of the window during uploading.
Resume uploading is available! In case you stopped uploading by yourself or it was interrupted by some other reasons you are able to continue it. In such case the "Resume" button will be shown instead of "Upload". Click it to continue uploading.
Note: Alternatively you may use the "Main" menu to select or upload files.
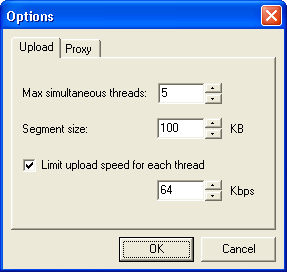
Upload Options
On this window you can see the following tabs: Upload and Proxy.
The first one is used for editing upload settings such as:
Max simultaneous threads (indicates number of upload threads which are run simultaneously. Such ability is supposed to speed up uploading in several times)
Segment size (Each file is uploaded by segments to allow multithread and resume uploading. means the size of file segment which is uploaded by upload thread.)
Limit upload speed for each thread (allows you to restrict speed of upload if needed)
Using the "Proxy" tab you can set proxy settings to use 4shared Desktop.
View Log
Log window shows you the list with errors descriptions. It will help you and us to understand the reason and way how to solve it. Use "Send to Support" button to mail the list to 4shared Support Team.
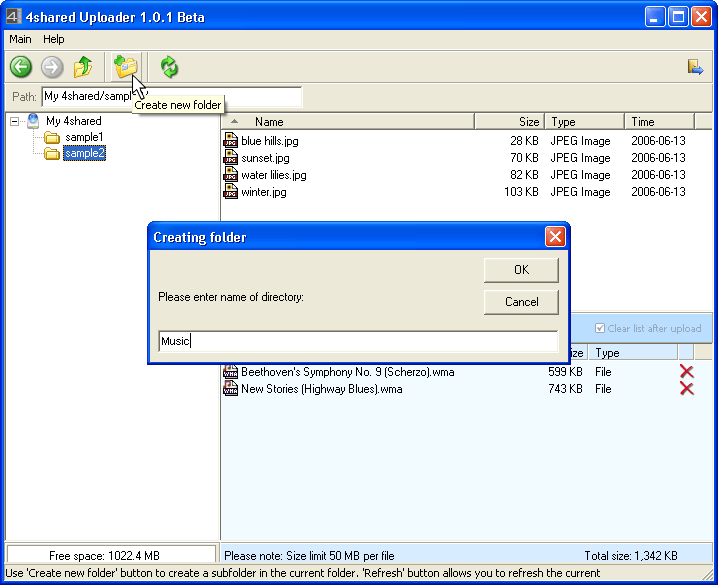
Folder creation
Select the directory where you want to create a new folder. To open a folder simply click it in the folder tree or double click it in the list of files and folders.
You can find the "Create new folder" button on the toolbar. Once you clicked it you are prompted to enter a name of new folder. Fill in the name and click the "OK" button to complete creation.
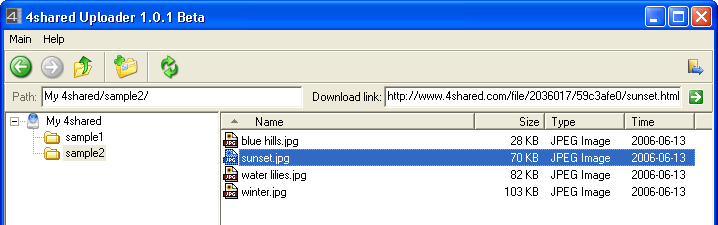
Getting the download link
Simply click on a file in the list of files and folders to view its download link. By clicking the "Go" button the download page of file will be opened in your Internet browser.
In case you have any question or need other assistance, or have problems or suggestions concerning 4shared Desktop you can write to support@4shared.com or contact us using feedback form which you can open by selecting the "Send Feedback" in the "Help" menu.
We do advance in expansion of functionality and improving developments day by day giving up-to-day possibilities to our users.
Speed up the routine process of uploading hundreds files to your account and make it much easier and handier with our specially developed "4shared Desktop" tool.
Friendly well-known interface and perfect usability of 4shared Desktop will increase productivity of your work and greatly lighten performance of tasks. This easy to use software is designed specifically to help manage multiple file uploads.
System Requirements:
Pentium II 350 MHz class CPU or faster
3 MB of disk space
128 MB of available RAM
Active Internet Connection
Recommended for Windows 2000/NT4/XP
How to install 4shared Desktop:
Click the link to download 4shared Desktop Installer.
Double click on the downloaded file to run the setup program.
Follow the instruction of setup program to install 4shared Desktop.
User instruction about how to use 4shared Desktop:
Login window
On this window you should fill in the login and password of your account that you were using during the registration to 4shared service. If you do not have 4shared account you should click the "Sign up now" link at the bottom of the window to create a new account.
Tick the "Remember me" check box if you want the application to remember the login and password and log in your account automatically when it starts.
Once you felt in the fields click the "Login" button to open your account. If the login or password is incorrect you will stay on this screen. In case you forgot your password you should click the "Forgot your password?" link in the lower right corner of the Login window.
Main window
After the program log in successfully and receive data of your account the main window is shown. There are following main controls:
Folder Tree (shows you the folder structure of your account)
List of files and folders (shows you the contents of selected folder)
List of files for uploading (contains the files you wish to upload)
Uploading files
Choose files or folders for uploading simply by dragging them onto this screen or you can use the "Select" button (3) to locate files or folders on your computer that you wish to upload. Please note that when selecting a folder it will be added to the list with all included files and subfolders.
You can delete a file from the list of files for uploading by clicking on the "Delete" icon (7) at the end of the line or by pressing the "Delete" button on the keyboard after the file (or files) is selected. The "Clear All" button (4) is used for deleting all files from the list.
Select the directory where you want to upload files to. To open a folder simply click it in the folder tree (1) or double click it in the list of files and folders (2).
Tick the "Clear list after upload" check box (6) if you wish to delete all files from the lower list after finish of upload process.
Once you chose the files they are ready for uploading. Click the "Upload" button (5) to start the process. You can also stop the upload process by clicking the "Stop" button in the lower right corner of the window during uploading.
Resume uploading is available! In case you stopped uploading by yourself or it was interrupted by some other reasons you are able to continue it. In such case the "Resume" button will be shown instead of "Upload". Click it to continue uploading.
Note: Alternatively you may use the "Main" menu to select or upload files.
Upload Options
On this window you can see the following tabs: Upload and Proxy.
The first one is used for editing upload settings such as:
Max simultaneous threads (indicates number of upload threads which are run simultaneously. Such ability is supposed to speed up uploading in several times)
Segment size (Each file is uploaded by segments to allow multithread and resume uploading. means the size of file segment which is uploaded by upload thread.)
Limit upload speed for each thread (allows you to restrict speed of upload if needed)
Using the "Proxy" tab you can set proxy settings to use 4shared Desktop.
View Log
Log window shows you the list with errors descriptions. It will help you and us to understand the reason and way how to solve it. Use "Send to Support" button to mail the list to 4shared Support Team.
Folder creation
Select the directory where you want to create a new folder. To open a folder simply click it in the folder tree or double click it in the list of files and folders.
You can find the "Create new folder" button on the toolbar. Once you clicked it you are prompted to enter a name of new folder. Fill in the name and click the "OK" button to complete creation.
Getting the download link
Simply click on a file in the list of files and folders to view its download link. By clicking the "Go" button the download page of file will be opened in your Internet browser.
In case you have any question or need other assistance, or have problems or suggestions concerning 4shared Desktop you can write to support@4shared.com or contact us using feedback form which you can open by selecting the "Send Feedback" in the "Help" menu.
 We do advance in expansion of functionality and improving developments day by day giving up-to-day possibilities to our users.
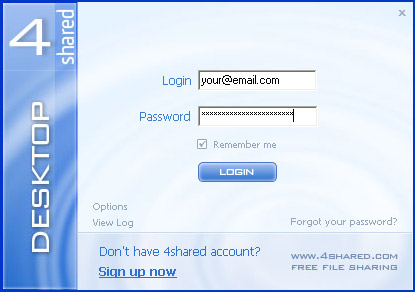


No comments:
Post a Comment
Please Post Sensible Comments ........Thanks.